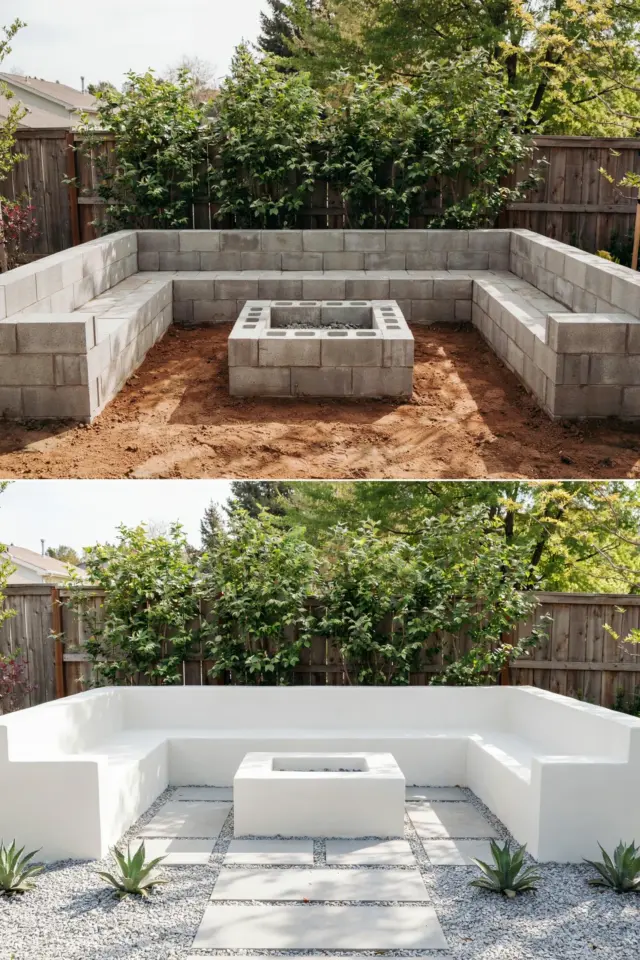
Last spring, I decided to build a DIY cinder block seating area with fire pit in my backyard. It turned out to be the best weekend project for creating a budget backyard lounge that we use almost every evening. The whole transformation cost me less than a weekend dinner out with friends, and now we have a cozy spot for roasting marshmallows and telling stories under the stars. If you have a flat patch of grass or gravel and a free Saturday, you can build this too.
Choosing the right cinder blocks for outdoor seating
I started by picking up standard 8x8x16 inch cinder blocks from my local hardware store. They are heavy, cheap, and stack without any mortar if you keep them level. For a U-shaped seating area that sits about six people, you will need around 60 blocks. I bought extra because some cracked during handling. Look for blocks that are straight and free of large chips. Do not use lightweight concrete blocks (often used for walls), as they tend to break under weight. Go for the dense, gray utility blocks made for retaining walls or foundations.
I also grabbed a few flat cap blocks (the solid kind that look like pavers) for the top row. They give a clean surface to sit on and keep cushions from slipping. If your store does not sell cap blocks, you can use regular pavers or even a layer of wood planks on top.
Planning your backyard seating layout around a fire pit
Before hauling blocks, I measured the fire pit diameter. My pit is a 36 inch metal fire ring, so I left a 12 inch gap between the ring and the first row of cinder blocks. That way, the heat does not crack the blocks and you have room to walk around safely. I marked the seating area with spray paint: a squared U shape with two arms extending about 6 feet each and a back wall of 8 feet. The open end faces away from the prevailing wind.
I also thought about traffic flow. You need at least 3 feet of clear space behind the seats so people can walk to their spot without bumping into chairs or garden beds. I used a garden hose to outline the shape first, then adjusted until it felt natural. Do not skip this step. Moving sixty blocks twice is not fun.
Step by step: building cinder block benches
I laid the first row without any adhesive. Just set each block on bare, leveled ground. If your yard has a slight slope, dig out the high side so the first row sits flat. Use a long level and a rubber mallet to tap blocks into position. I stacked three rows high for a comfortable seat height (about 18 inches). For the backrest, I added a fourth row only on the back wall, leaving the arms at three rows. That way the bench supports your lower back naturally.
After the first row, I staggered the second row like brickwork, overlapping the joints. This makes the wall stronger and looks more intentional. I did not use any glue or mortar because the weight of the blocks holds everything together. But if you want extra stability, a tube of masonry adhesive along the edges of the top row works great. I only used adhesive on the cap blocks so they do not slide off when someone leans back.
Adding a sleek stucco finish on a budget
Plain gray cinder blocks can look a bit industrial, so I gave mine a stucco finish with paint. I mixed a small bucket of Portland cement with fine sand and water until it was the consistency of thick pancake batter. Then I troweled a thin layer (about 1/8 inch) onto the front faces of the blocks. You do not need to cover every pore, just enough to smooth out the rough texture. This took me about one hour for the whole seating area.
Let the stucco cure for 24 hours, then paint with exterior acrylic paint in a warm taupe color. I used a roller for the flat faces and a brush for the crevices. Two coats did the trick. The result looks like a real masonry wall, not a pile of cheap blocks. If you want even less work, skip the stucco and just paint directly on the blocks. The paint will soak in, so you will need three coats instead of two.
- Materials for stucco finish:
- Portland cement (a 10 lb bag covers about 30 blocks)
- Fine masonry sand
- Water
- Masonry trowel or putty knife
- Exterior acrylic paint (1 gallon)
- Paint roller and tray
Selecting gravel and pavers for the base
I wanted a clean, level floor
#DIYcinderblock #backyardseating #firepit #weekendproject #budgetbackyard
Leave a Comment