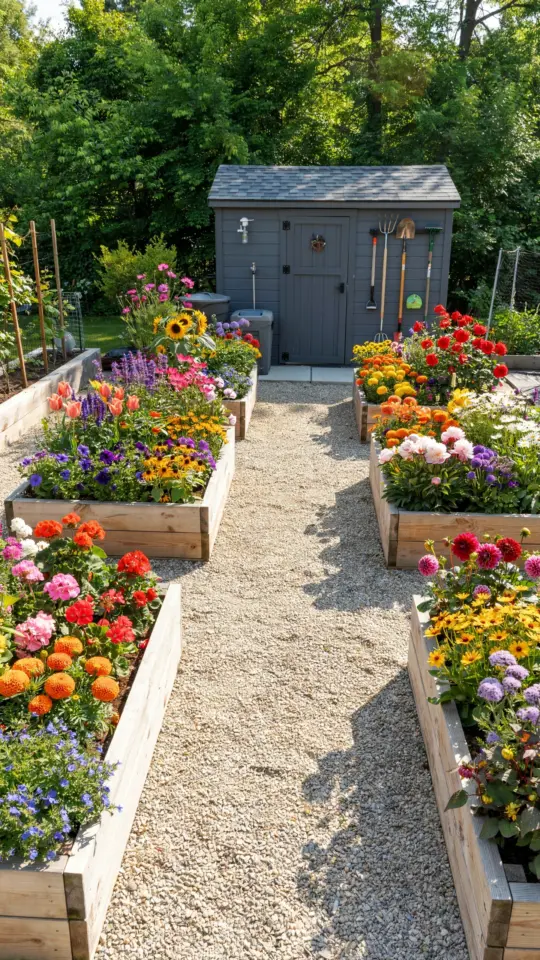
If you have ever dreamed of growing your own food but felt overwhelmed by the idea of tilling a big patch of ground, a raised bed vegetable garden might be exactly what you need. I remember my first attempt at gardening. I dug up a corner of my yard, fought with rocks and roots, and ended up with a muddy mess after one rain. A few years later I switched to raised beds with clean gravel paths, and it completely changed how I garden. This design is forgiving for beginners and keeps your space looking tidy all season long. Let me walk you through the simple steps to create your own organized layout with gravel paths and a handy garden shed.
Why Choose a Raised Bed Vegetable Garden Layout?
A raised bed layout gives you control over your soil from day one. Instead of fighting whatever dirt is in your yard, you fill the beds with a rich mix of compost, topsoil, and peat moss. The soil drains better and warms up faster in spring, which means you can plant earlier and grow more. Because you walk only on the paths between the beds, the soil stays loose and aerated. Your vegetables will thank you with stronger roots and bigger harvests.
Another big reason is weed control. Raised beds make weeding much easier because you only have to pull what pops up inside the bed. The gravel paths also discourage weeds from creeping in from the sides. For someone new to gardening, this saves hours of backbreaking work. Plus, the organized rows look beautiful and make it simple to keep track of what you planted where.
Planning Your Organized Vegetable Garden Design
Before you buy a single board, take a piece of paper and sketch your space. Measure the area where you want your vegetable garden to go. A good rule of thumb for beginners is to start with two or three beds that are four feet wide and eight feet long. Four feet wide means you can reach the middle from either side without stepping into the bed. Leave at least two feet between beds for gravel paths, or three feet if you want room for a wheelbarrow.
Position your beds so they run north to south if possible. This gives each plant even sunlight throughout the day. Also consider where your water source is. You do not want to drag a hose across the whole yard. If you are adding a garden shed, place it near the beds but not shading them. A small shed, even a basic one from a home store, keeps your tools dry and organized. You can hang rakes and trowels on the wall for quick access.
Building Sturdy Wooden Beds for Your Vegetable Garden
For the beds themselves, untreated cedar or redwood is the best choice for beginners. These woods resist rot naturally and do not leach chemicals into your soil. Pine is cheaper but will only last two or three years. I recommend using 2×6 boards stacked two high to create a 12 inch deep bed. That depth is perfect for most root vegetables like carrots and potatoes.
Cut your boards to size at the hardware store or use a handsaw. Assemble them into rectangles with exterior screws at each corner. You can reinforce the corners with metal brackets if you want extra stability. Place the frame directly on the ground. There is no need to remove the grass underneath. Lay down a layer of cardboard first to smother the grass, then fill the bed with soil. I once skipped the cardboard layer and regretted it when grass pushed through. Learn from my mistake.
Installing Gravel Paths Between Garden Beds
Gravel paths are the secret to a neat, low maintenance garden. After your beds are in place, level the ground in the walkways. Lay down a weed barrier fabric to keep grass from growing through. Then spread a two to three inch layer of pea gravel. Pea gravel is smooth underfoot and drains well. You can also use crushed stone if you prefer a firmer surface. One bag of gravel covers about three square feet at two inches deep, so measure your paths and buy accordingly.
Here is a quick list of why gravel paths work so well for raised bed gardens:
- They keep your feet clean and dry even after rain.
- Weeds have a hard time growing through the gravel and fabric.
- The paths visually separate the beds, making the garden feel organized.
- You can easily rake the gravel back into place if it shifts.
I suggest edging your paths with metal or plastic strips to keep the gravel from spilling into the beds. This is a small detail that makes a big difference in how tidy your garden looks all year.
Adding a Garden Shed for Tools and Storage
A garden shed does not have to be fancy or expensive. Even a small resin shed or a repurposed wooden storage cabinet works well. What matters is that you have a dry place for your tools, gloves, seeds, and fertilizer. Without a shed,
#RaisedBedGarden #VegetableGarden #GardenDesign #GravelPaths #GardenShed
Leave a Comment