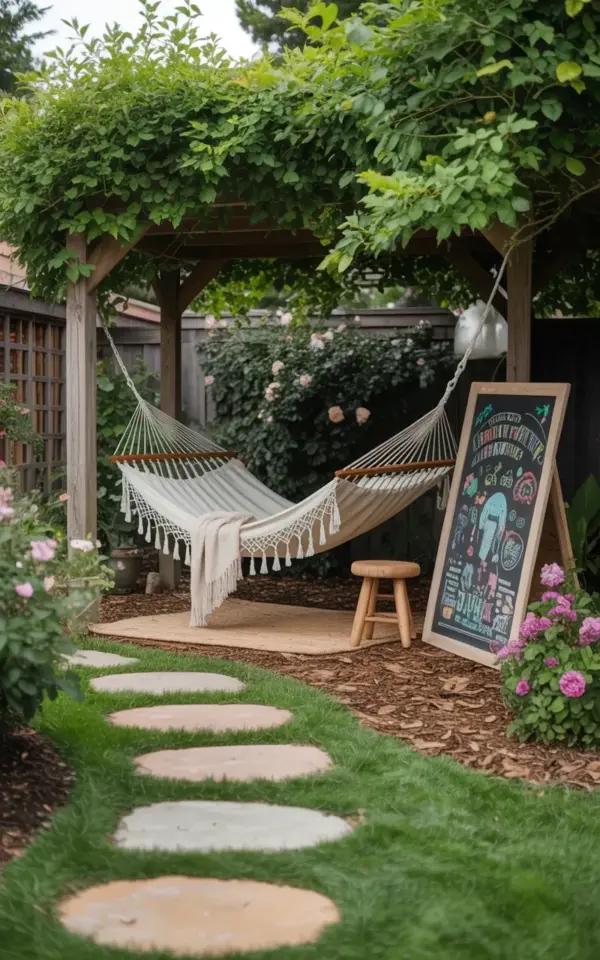
The white rope hammock hangs between two sturdy wooden posts, its fringe catching the late afternoon light. A cream blanket is draped over one side, and the stone path leads your eyes straight to it, past the chalkboard art leaning against the garden bed. That’s the exact backyard hammock nook I fell for, and honestly, it took me way too many tries to get mine right. Look, I’ve made every mistake in the book, so let me save you the hassle.
How High Should You Hang a Rope Hammock?
Most people hang their hammock too high, thinking it needs to be sky-high to feel like a real escape. The opposite is true. Aim for the center of the hammock to sit about 18 inches off the ground when you’re sitting in it. That way you can swing into it without doing a weird butt-first hop.
In that photo, the hammock sags just right, giving it that relaxed, hammock-shaped curve instead of a tight rope bridge. Here’s the thing: you also need to account for the fringe. If your hammock has hanging fringe, it’ll touch the mulch when you sit down. That’s fine, actually, it adds to the organic feel. But don’t let the whole thing drag.
My first attempt, I tied the ropes so high that I needed a stepladder to get in. Not exactly the peaceful nook I imagined.
Weaving a Garden Path That Actually Invites You In
A path is not just a way to get from the patio to the hammock. It’s the whole “come sit with me” invitation. The stone path in the reference photo works because the pavers are irregular and large, like stepping stones made for slow wandering. You can’t rush on stones like that, and that’s the point.
Mistake number two: making the path too narrow or too straight. A curved, slightly meandering path slows you down. It forces you to notice the flower beds, the little worm wiggling across the stone, the way the mulch smells after rain.
If you’re planning your own, lay the stones out first, then walk them. Adjust. Repeat.
Making Your Hammock Nook Cozy Without Overdoing It
The cream blanket in the photo is doing so much heavy lifting. It adds warmth, texture, and that “someone actually lives here” vibe. But don’t turn your hammock into a bed fort. The usual mistake is piling on three blankets, five pillows, and a stuffed animal. No. Keep it simple.
- One lightweight blanket for cool evenings.
- One small cushion if you really need neck support, but skip the giant floor pillows.
- Maybe a flat woven mat under the hammock if you want a spot to toss your sandals.
The fringe on a rope hammock already gives you that boho detail. Add the blanket and stop. Your nook will look styled, not staged.
Choosing the Right Wooden Posts for Your Hammock
I once used old cedar fence posts from a salvage yard. They looked charming for about two weeks, then they started to bow in the middle like a sad banana. The wooden posts in the reference image are thick, straight, and clearly made for the job. You want posts that are at least four inches by four inches, and they need to be set in concrete below the frost line.
Pressure-treated pine is fine, though cedar is prettier. Match the wood tone to your garden furniture if you can. And please, for the love of all that is cozy, don’t use metal chain posts meant for a clothesline. That’ll ruin the whole warm vibe.
One more thing: angle the posts slightly outward at the top, about 10 degrees. It keeps the hammock stable without extra tension, and it looks natural, like the posts are leaning back in their own lazy afternoon.
The Chalkboard Art Trick for a Personal Garden
That chalkboard on the right side of the photo is pure genius. It makes the whole space feel like a conversation with the gardener. You can write a welcome note, a funny quote, or a simple “the hammock is mine” warning. I change mine every few weeks. Last month I drew a little bee and wrote “Pollen season.” Nobody got it but me. That’s fine.
The mistake here is buying generic metal signs or plastic decorations. They fade and collect grime. A chalkboard is cheap, easy to repaint, and takes about ten seconds to customize. If you’re artistic, draw something. If you’re not, write your name in cursive and call it a day.
Just make sure you hang it away from direct sprinklers. I learned that when my chalk art turned into a abstract watercolor mess after one morning of watering.
Mulch, Weeds, and the Ground Beneath Your Nook
Brown mulch does more than make everything look neat. It suppresses weeds, retains moisture, and gives a soft landing if you ever roll out of the hammock mid-nap. The photo shows a thick layer of fresh mulch, and honestly, that might be the most important detail of all.
Don’t just toss a few bits of bark over bare dirt. Go for at least three inches deep, and reapply every spring. I also put a weed barrier underneath, though I know some gardeners swear against it. Do whatever works for your climate.
Oh, and keep the path and the mulch distinct. In the photo, the stone pavers sit slightly above the mulch line, so you never get that muddy puddle situation after a storm. That’s the kind of planning that makes the whole nook feel intentional instead of thrown together.
So there you have it. The real secret to a backyard hammock nook isn’t a fancy budget or professional landscaping. It’s avoiding those seven common mistakes and letting the space feel like you. Start with a solid hanging height, a meandering path, and one good blanket, then let the chalkboard carry your personality from there.
Got a corner of your garden that’s calling for a hammock? Save this post to your outdoor living board and tell me where you’re planning to hang yours. I’d love to hear about it.
Leave a Comment