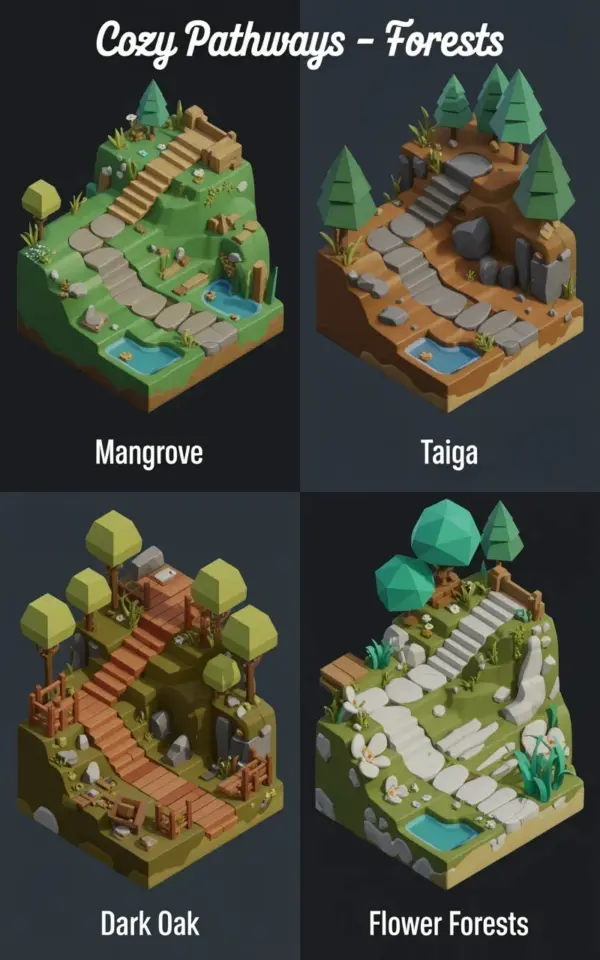
If you’re knee-deep in spring planning and your garden path still looks like a muddy afterthought, this one’s for you. I’ve been fiddling with a specific idea lately, pulling inspiration from a totally unexpected place: old-school isometric game maps, and honestly, it works. These forest garden path designs take four distinct video game biomes and turn them into real-world layouts you can actually build without a landscaping crew on speed dial.
The key is that a path isn’t just a way to get from A to B. It’s the backbone of your whole woodland garden. You can build one of these for the price of a few bags of mulch and a Saturday afternoon. Or you can go all-in with stepping stones and lumber. The choice is yours.
A Note on Planning the Layout in Your Garden Beds
Before you start hauling gravel, look at your space with fresh eyes. Grab a hose or a long rope and lay it on the grass to simulate the flow of the path. Walk it a few times, then adjust. It sounds silly, but you need to feel the turn radius.
For a natural spring look, avoid straight lines at all costs. A straight path through a garden feels like a driveway, not a wander. Smooth curves slow you down. They force you to notice the unfurling ferns and the early crocuses poking through the soil. Graph it out on paper first if you like, but the hose trick works best for visualising the bend.
4 Forest Garden Path Layouts Inspired by Isometric Maps
Isometric maps are those angled, top-down views of game worlds where you can see the layout perfectly. They are, without realizing it, the best mood boards for garden structure ever created. Each one offers a different vibe, from coastal swamps to northern pine forests. Here are the four we are using today.
– Mangrove: Winding stone over water features.
– Taiga: Rugged dirt with scattered boulders.
– Dark Oak: Elevated wooden boardwalks.
– Flower Forest: Soft, low-maintenance mulch trails.
Layout One: The Mangrove Winding Stone Path for Wet Spots
If your property has a low spot where water tends to gather after a rain, the Mangrove layout is your savior. This design uses irregular flagstone set into a bed of pebbles. You are essentially building a stepping-stone causeway across the damp areas.
Instead of a solid concrete slab, lay the stones slightly apart. In the gaps, you can plant creeping thyme or moss. It mimics that game map feel where the vegetation reclaims the walkway. It’practical for drainage, too. The water sinks between the stones rather than pooling on top.
For the budget, hit up a local landscaping supply for “irregular” or “seconds” flagstone. You don’t need perfect squares. In fact, the more wonky the shape, the better it looks when laid. Aim for stones that are at least two inches thick so they don’t wobble.
Layout Two: The Taiga Forest Dirt Path (Free and Wild)
This is by far the cheapest option, and honestly, it might be my favorite. The Taiga layout is just a well-trodden dirt track. You don’t need to buy anything except maybe a bag of decomposed granite to keep the mud down.
The trick is to define the edges. Dig a slight trench, about two inches deep, and mow the lawn right up to the edge. This creates a crisp border that looks intentional. Look at the pine forest maps; they always have that reddish-brown soil showing through. It feels rugged.
Scatter a few medium-sized stones along the sides, not in the middle. It pushes the walker to the center and keeps them dry. For drainage, mix the native soil with a bit of coarse sand. I did this in my own back yard last spring and my boots stayed dry even in a downpour.
Layout Three: The Dark Oak Wooden Path and Boardwalk
Here’s the thing about wooden paths: they cost a little more, but they last forever if you build them right. The Dark Oak design is perfect for a sloped garden where you need stairs or a flat platform. It grounds the space with earthy brown tones that contrast beautifully with bright spring green.
You can use leftover decking boards or purchase cedar that will naturally resist rot. I’m talking about building a simple frame of 2x4s and laying planks on top. For the steps, cut your risers shorter than you think you need. Game maps always show gentle staircases that feel inviting, not steep cliff faces.
To save cash, consider using railway sleepers or treated lumber. They give you that chunky, structural look. Just be sure to lay a weed barrier underneath, or you will be pulling grass out from between the slats all summer.
Layout Four: The Flower Forest Mulch Trail for Maximum Color
Ok so, the Flower Forest is all about the soft stuff. This layout uses wood chips or shredded bark. It’s the easiest path to install, period. You just lay down cardboard boxes to smother the weeds, then dump your mulch on top.
It creates that soft, bouncy feeling underfoot that you get in those fantasy games. You can make it wider than the others, too. This path encourages you to slow down and look at the wildflowers swaying on the edges.
The downside is you have to top it up every year. The mulch breaks down and becomes soil, which is good for the garden but annoying for your path depth. Use arborist chip drops if you want the free version. Just be aware that fresh chips can be a bit chunky and stick to your shoes for the first month.
Bringing the Isometric Grid into Your Real Garden Plan
The best part about these designs is that they work so well together. You can start with the Taiga dirt path and upgrade sections with Dark Oak planking if the ground gets too wet. It’s modular. That is the beauty of looking at a map, you can see how the systems connect.
Don’t be afraid to use contrasting materials. A stone border that suddenly turns into wooden steps is a classic feature in these maps. I’m a big fan of using reclaimed brick, old pavers, and even broken concrete (call it urbanite) to edge your flower beds.
Just remember that the best path is the one you don’t have to trip over. Measure your step distance. Keep the path at least 24 inches wide, and if you are planning to wheel a barrow down it, make it 36 inches. Your back will thank you when you’re hauling those heavy bags of soil in July.
Try sketching out a rough grid for yourself. You don’t need to be an artist. Just draw a few squares and map out where the high points and low points are. You’ll be surprised how quickly the right layout shows itself.
I hope these ideas give you a fresh perspective on your spring garden plans. The forest garden path you create is going to be the one thing you actually walk through every single day. Start small, keep it affordable, and let the path wander a little. Go spring planting! 🌿
Leave a Comment