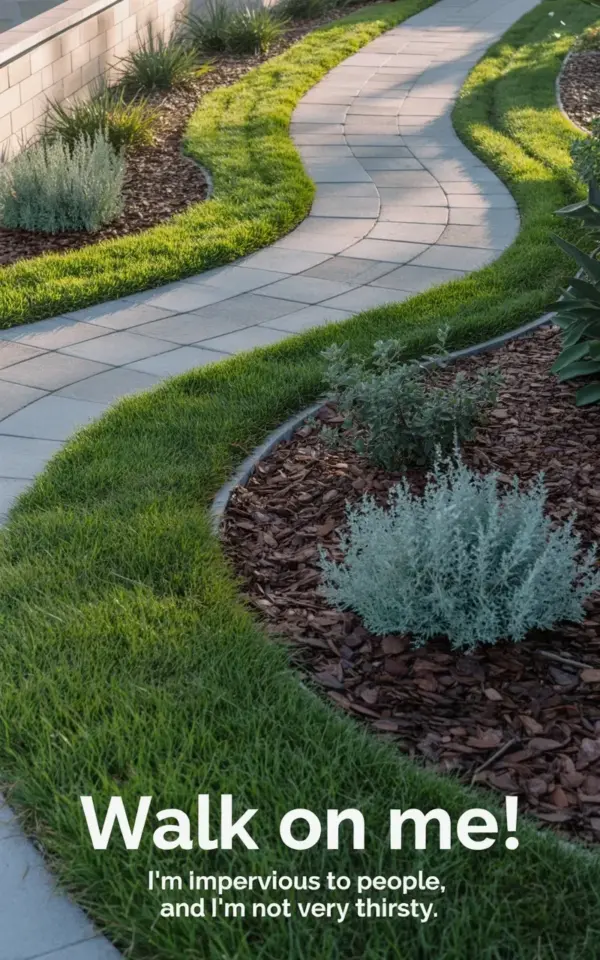
The light gray pavers curve through the lawn like a calm river, bordered by silver-blue mounds of Russian sage. Dark brown mulch beds frame the planting, and near the bottom of the photo, a small stamped message reads “Walk on me!” That little touch makes the whole path feel inviting. This curved garden path is exactly what you can build yourself with basic tools and a weekend of work. In this guide, I will show you how to lay concrete pavers on a solid base and plant drought tolerant shrubs that thrive without constant watering, all while keeping your budget intact.
Choose Concrete Pavers That Fit a Tight Budget
Natural stone looks lovely, but it can drain your wallet fast. Concrete pavers give you the same clean, modern look for a fraction of the price. You can buy standard gray pavers at any big box home store for around one to three dollars per square foot, depending on thickness and size.
For a curved path, smaller rectangular pavers are easier to lay around bends than massive slabs. You can also use 12×12 concrete squares and offset them slightly along the curve. Light gray pavers, like the ones in this garden path, stay cool underfoot and reflect sunlight instead of absorbing heat.
If you really want to save money, check local classifieds or landscape supply yards for reclaimed pavers. Many contractors sell leftovers at a deep discount, and small chips or minor discoloration simply add character to a garden walkway.
Build a Solid Paver Base Without Overpaying
The secret to a durable curved garden path is the base, not the pavers themselves. You need a layer of compacted gravel followed by a layer of bedding sand. This combination prevents settling and keeps the path level even after heavy rain or foot traffic.
You can rent a plate compactor from a tool rental store for about forty dollars a day. That is a worthwhile investment because hand tamping a long path will wear you out and produce a weaker base. For a short path, a hand tamper works fine and costs nothing if you already own one.
Spread about four inches of crushed gravel, then compact it in two passes. Add two inches of coarse sand on top, screed it smooth, and compact again. This method works for straight sections and gentle curves alike, as long as you keep the layers even.
Lay Out the Curve With String and Spray Paint
Before you dig, decide where the path should go. Use a garden hose or a thick rope to outline the curve, and then stand back to check the flow. A gentle S curve looks natural, while a tight zigzag feels awkward and awkward to walk on.
When you are happy with the shape, mark the edges with orange spray paint. Remove the hose and use a shovel to cut along the painted lines. Strip away the grass and topsoil to a depth of about six inches, accounting for your gravel, sand, and paver thickness.
As you dig, keep the trench slightly wider than the pavers. This gives you room to adjust the curve and leaves space for the mulch beds along the edges. A clean, tidy edge makes the entire path look professionally installed.
Plant Russian Sage for Drought Tolerant Color
Russian sage is the quiet hero of this garden path. Its silver gray stems and airy blue-purple flowers soften the hard lines of the concrete without covering them. Once established, Russian sage barely needs water, making it perfect for busy gardeners or dry climates.
Plant Russian sage in full sun and well drained soil. Space each plant about eighteen to twenty-four inches apart so the mounds have room to fill in. In the photo, the silver-blue mounds sit directly against the paver edge, creating a soft, textured border that contrasts beautifully with the vibrant green lawn.
You can mix in other low water plants to extend the bloom season and add variety. Here are a few reliable companions for Russian sage:
- Lavender for fragrant spikes and gray-green foliage
- Sedum for succulent leaves and late summer flowers
- Yarrow for flat clusters of yellow or pink blooms
- Ornamental grasses for movement and structure
- Coneflower for bold, daisy-like petals and seed heads
All of these tolerate dry soil and full sun, so your mulch beds will stay colorful without a sprinkler running every day.
Mulch Beds Keep Weeds Down and Moisture In
Dark brown mulch is not just for looks. A layer of organic mulch two to three inches deep blocks sunlight from reaching weed seeds, reducing the time you spend pulling weeds. It also holds soil moisture, which matters especially during the first summer after planting.
Buy mulch in bulk from a local landscape supply company instead of bagged options at the store. Bulk mulch is often half the price per yard, and you can have it dumped right in your driveway. Rake it into an even layer, keeping it about an inch away from the paver edges so it does not create a muddy mess on the walkway.
For this project, dark brown mulch makes the gray pavers pop and provides a familiar backdrop for the silvery Russian sage. Replenish the mulch once a year in spring, and the beds will look fresh with minimal effort.
Add a Personal Message or Fun Detail
The “Walk on me!” stamped into the concrete in the photo is a brilliant finishing touch. It turns a simple path into a conversation piece and makes guests smile as they step toward your garden. You can achieve a similar effect with a custom stamp or letter stamps that press into wet concrete.
Wait until the concrete pavers are freshly laid but still slightly damp. Test the stamp on a spare paver first to get the depth right. Press firmly and evenly, then lift straight up to avoid smearing. If you make a mistake, smooth the surface and try again before the concrete sets.
If you prefer not to stamp, consider placing a decorative tile or a flat stone with an engraved message along the path. The message does not need to be clever. Something like “To the garden” or “Enjoy the walk” can be just as charming and personal.
Maintain Your Path for Years
A curved garden path with concrete pavers and mulch beds is one of the lowest maintenance landscape ideas you can do. Sweep the pavers occasionally to keep dirt off the surface, and pull the few weeds that pop through the sand joints. You can also hose down the pavers for a quick refresh before summer gatherings.
Check the paver edges each spring and top up the sand or gravel if any low spots appear. Russian sage should be cut back to about twelve inches in early spring to encourage bushier growth. With these simple tasks, your path will stay level, clean, and inviting for a decade or more.
Now is the perfect time to plan your own version. Look at your yard, trace a gentle curve with a garden hose, and gather a few affordable materials. You do not need a huge budget or a professional crew. Just a solid base, some drought tolerant plants, and a little creativity to make the space feel truly yours. Save this idea for your next landscaping project, and enjoy the walk every single day.
Leave a Comment