Finding the Perfect Spot for a Budget Backyard Hammock Setup
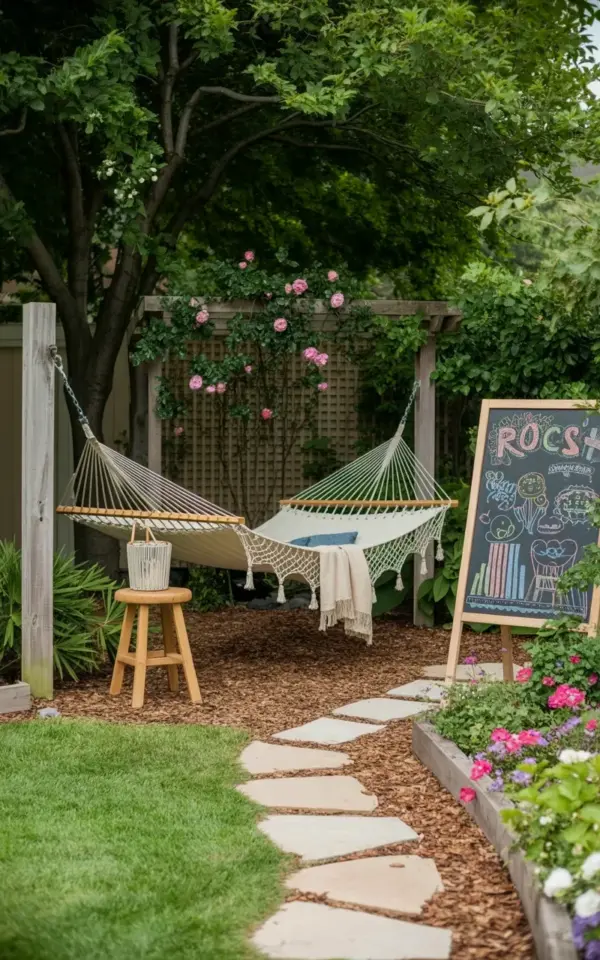
Last spring I finally carved out a corner of my small yard that had been nothing but bare dirt and weeds. A budget garden doesn’t have to mean boring. With a white rope hammock suspended between two wooden posts and a few thoughtful touches, that neglected patch turned into my favorite place to read on warm afternoons. The hammock with fringe and a cream blanket draped over it sits right in the center of the space, exactly as you see in the photo above. A wooden stool beside it holds a cup of tea, and the whole setup cost less than most store-bought patio furniture sets.
If you have a small yard or a narrow side strip that feels wasted, a hammock can transform it fast. You do not need a huge budget or professional help. The photo shows stone pavers leading from the foreground to the hammock area, with fresh brown mulch covering the ground. That simple path cost about forty dollars and took one afternoon to lay. The large chalkboard on the right side adds playful character without any permanent commitment.
Choosing a White Rope Hammock with Fringe That Holds Up
When I shopped for a hammock, I wanted something light and airy that would not overwhelm the small space. A white rope hammock with fringe fits that perfectly. The cotton rope feels soft against your skin and breathes well on humid days. Look for one with thick, twisted cords and reinforced loops at each end. The fringe along the edges is not just decorative. It also prevents the rope from unraveling over time.
Hang the hammock between two sturdy posts or trees at least twelve feet apart. In the photo, wooden posts hold the hammock securely. I set mine in concrete footings for extra stability. The whole thing cost me around sixty dollars for the hammock and another fifteen for the posts. Compare that to a full patio sofa set, and you can see why this approach makes sense for a seasonal refresh.
Layering a Cream Blanket and Wooden Stool for Cozy Comfort
A cream blanket thrown over the hammock does two things. It softens the look and gives you something to wrap around your shoulders when the evening gets cool. The blanket in the photo is a simple cotton throw I found at a thrift store for eight dollars. It picks up the warmth of the wood posts and balances the bright white rope. A wooden stool beside the hammock holds a book, a drink, or a small plant.
You can repurpose a stool you already own or pick one up for a few dollars at a garage sale. Sand it lightly and apply a coat of outdoor sealant if you plan to leave it outside. The combination of the cream blanket, natural wood, and white rope creates a calm, inviting spot that feels intentional without looking staged.
Building a DIY Chalkboard for Outdoor Garden Decor
The large chalkboard in the photo is the most playful element in the whole setup. I made mine from a scrap piece of plywood, a can of chalkboard paint, and an old picture frame I found at a flea market. The colorful illustrations and drawings on it change with the season. Right now I have a simple sunflower sketch and a little note that says “read here.”
This DIY chalkboard garden decor project takes about two hours from start to finish. Here is what you need:
- A flat board or piece of plywood cut to your desired size
- Chalkboard paint (one can covers up to three coats on a medium board)
- A frame or wooden trim to give it a finished edge
- Outdoor chalk markers that resist rain better than regular chalk
- Picture hanging hooks or wire to attach it to a post or fence
Seal the frame with a clear outdoor varnish so it holds up through morning dew and unexpected showers. I leaned mine against the fence on the right side of the hammock, exactly as you see in the photo. It adds a custom touch that no store can replicate.
Installing Stone Pavers and Mulch for a Clean Garden Path
The garden path in the photo uses large, irregular stone pavers set into fresh brown mulch. I chose this combination because it drains well and costs much less than poured concrete or brick. The stones themselves came from a landscape supply yard for about a dollar each. I laid them directly on top of a layer of landscape fabric to prevent weeds from pushing through.
Space the pavers about one step apart so you naturally slow down as you approach the hammock. The mulch around them softens the look and keeps the ground from turning muddy after rain. A bag of brown mulch costs around three dollars, and I used four bags for the whole path. This stone pavers and mulch path now ties the seating area to the rest of the yard without any hard edges.
Seasonal Updates to Keep Your Outdoor Living Space Fresh
One reason I love this layout is how easily it adapts to different seasons. In early summer, I swap the cream blanket for a lighter linen throw and add a small vase of fresh flowers on the wooden stool. Come autumn, the chalkboard gets a drawing of falling leaves and the blanket changes to a thicker knit. The hammock stays up through most of November where I live, then comes down for storage until March.
For seasonal outdoor living updates, focus on small swaps that do not cost much. A new cushion for the stool, a different color of chalk, or a string of solar lights along the fence rail can change the whole mood. The white rope hammock with fringe works as a neutral base that accepts any accent you throw at it. That flexibility matters when you are working with a small budget and want your yard to feel current without a full overhaul every few months.
Simple Maintenance Tips for Your Affordable Garden Setup
Keeping this space tidy takes very little effort. Shake out the hammock once a week to remove leaves and debris. Bring the cream blanket inside during rainy spells to prevent mildew. The chalkboard needs a quick wipe with a damp cloth before you draw something new. Replenish the mulch once a year to keep the path looking fresh and weed-free.
The stone pavers do not need any sealing or special care. If one settles unevenly over time, just lift it, add a little sand underneath, and set it back in place. This whole affordable garden setup stays low-maintenance because every material was chosen for durability and ease. You are not wrestling with complex irrigation systems or expensive furniture that needs covers and cushions stored every night.
A budget backyard garden hammock setup like this one proves that a small yard can hold a lot of personality without holding a big price tag. If you have been waiting for the right time to create your own cozy outdoor spot, now is the moment to gather a few simple materials and start. Pin this idea to your inspiration board, and when you finish your own version, drop a comment below to share what you changed. I would love to see your take on the chalkboard drawings.
#budgetgarden #hammock #backyardideas #diychalkboard #outdoorliving
Leave a Comment