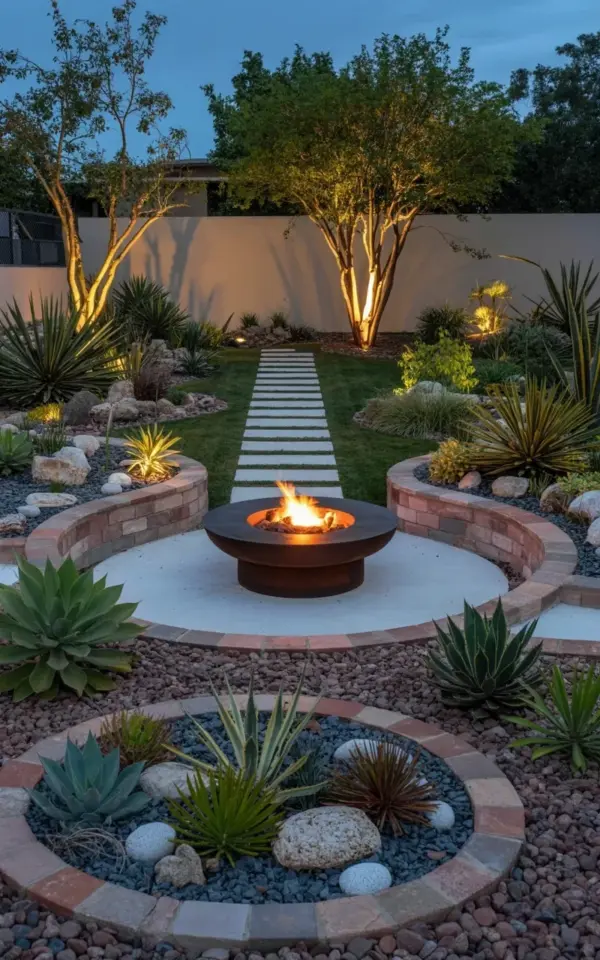
It’s 9 p.m. and your backyard finally looks like the kind of place people pay to visit. The fire pit throws a low orange glow, the agave plants catch the light like sculpted blue-green spears, and a line of white stepping stones disappears toward the back wall where two small trees glow from behind. That scene is exactly what a budget fire pit garden ideas board looks like in real life, not on a stylized Pinterest mock-up. And the best part? None of it requires a landscaper, a permit, or a credit card balance you’ll regret.
I’ve built this exact look in my own yard, on a budget that would make a fast-food run feel extravagant. So let me walk you through the whole setup, piece by practical piece.
Why Agave Is the Smartest Budget Plant You’ll Ever Grow
Let’s talk about the agave in that photo, because it’s doing a lot of heavy lifting. Specifically, you’re looking at blue agave and a few other succulents arranged in circular beds around the fire pit. These plants are basically the gift that keeps giving. You buy one small agave for maybe $8 to $15, and it slowly grows into a sculptural centerpiece that looks expensive as hell.
Here’s the thing, agave needs almost nothing. No daily watering, no fertilizer, no fussing over soil pH. I accidentally ignored mine for three weeks during a summer heatwave and it responded by throwing out a new leaf. That’s the kind of resilience you want when you’re on a budget and can’t afford to replace dead plants every spring.
Another angle: agave pups. Most varieties produce offsets, baby plants that grow at the base. You can separate them, replant them, and suddenly you have three agaves for the price of one. That’s how I filled a 12-foot border for maybe $20 total. If you have patient friends with agave, ask them for pups. People love giving away plant babies they didn’t ask for. Honestly, the hardest part is waiting a year for the first pups to appear.
Best budget agave options:
- Blue agave, the classic spiky showstopper, hardy in warm zones and slow enough that it won’t outgrow a small bed.
- Whale’s tongue agave, for a softer, wider leaf shape that looks almost futuristic.
- Agave desmettiana, a no-spike variety that won’t stab you when you’re reaching for a s’more.
Building a Circular Fire Pit That Doesn’t Cost a Fortune
The centerpiece of this whole design is a simple circular fire pit, and before you start pricing out natural stone kits, stop. The one in the photo is made of dark metal, and it’s sitting in a bed of gravel with a curved border of stones. You can build this for under a hundred bucks.
Buy a steel fire bowl or ring, something like a 36-inch diameter sheet metal ring. Place it directly on a level patch of ground. That’s it. Then surround it with a circle of budget-friendly materials. In the photo, you see reddish-brown stones forming a border, and that’s your main cost. A bag of river rock or crushed brick runs about $5 to $7. You’ll need maybe 10 to 15 bags, depending on the circle size.
One trick I learned the hard way: level the ground first. I spent an afternoon arranging a beautiful stone circle only to watch the fire bowl wobble every time someone leaned on it. Put down a layer of paver base, tamp it, and then lay your ring and stones. Twenty minutes of prep saves you two years of frustration.
Also, check online marketplaces for used fire rings. People move and just want the thing gone. I’ve seen free steel rings posted more than once. Grab a wire brush and some high-temp spray paint, and you’ll have a custom-looking fire pit for the cost of a used t-shirt.
The Red Stone Trick: Making Mulch Look Expensive for Pennies
That reddish-brown stone you see around the agave beds? It’s doing a lot of visual work and costing almost nothing. Crushed brick or decomposed granite in warm tones gives the whole garden a cohesive, deliberate look. You don’t need expensive Mexican beach pebbles or polished river rocks. Just find a local landscaping supplier and ask about “crushed red fines” or “budget stone screenings.”
Here’s the difference between this and regular mulch. Stone doesn’t decompose, doesn’t blow away, and doesn’t need to be replaced every year. So even though the upfront cost is slightly higher than wood chips, it pays for itself in two seasons. I put down a layer of red crushed stone in my front bed three years ago and it still looks freshly spread. Meanwhile, my neighbor has re-mulched twice.
When you spread it, go for a depth of about two inches. Too thin and you’ll see dirt poke through; too thick and watering succulents becomes a muddy mess. And if you want the exact look from the photo, keep the stone within the circular border beds. It’s a subtle thing, but a clean edge makes the whole garden read as intentional.
White Stepping Stones That Open Up a Small Backyard
Now, the path. The photo shows white stepping stones leading from the fire pit area toward a beige wall with illuminated trees. This is my favorite budget trick in the entire design. Light-colored stones reflect the night sky and the fire glow, which makes a small yard feel bigger and more open. Dark pavers would soak up the light and close the space in.
You don’t need to buy fancy precast concrete rounds. Look for square or rectangular concrete pavers in a light finish. Big box stores sell them for less than $3 each. I used a set of 16-inch square pavers for my walkway, spaced about one comfortable step apart, and it cost me under $40 total.
Here’s a genuinely useful tip: set the pavers directly into the soil for a temporary path, or go the extra mile and bed them in sand. If you’re renting, do soil. If you own, do sand. The sand method takes an extra hour but prevents the pavers from shifting when you walk on them after a rain. I skipped sand in my first attempt and my path looked like a drunken hopscotch board within six months.
And put a slight gap between the path and the agave beds. A few inches of exposed ground or gravel creates a clear visual separation. The photo has that gap, and it’s one of those design details you don’t notice until it’s missing.
Lighting for a Night Garden Without an Electrician
The illuminated trees in the photo are the secret sauce. But you can get that exact effect without any hardwired wiring. Solar path lights with a warm LED glow are stupid cheap now. I’m talking $20 for a six-pack on sale. The trick is to position them behind a plant or tree so the light shines upward through the leaves, not directly into your eyes.
In the original scene, the trees are backlit against the wall, which creates that cozy, layered nightgarden feel. To replicate that, take two or three warm white solar spotlights and aim them at the base of a tree or a large potted agave. The light bounces off the wall behind, casting a soft halo. It looks like professional landscape lighting, but you paid $25 and didn’t call anyone.
For the fire pit area itself, skip overhead lights. Let the fire do the work. Maybe add a single string light overhead if you’re feeling fancy, but keep it off the path. The white stepping stones will catch the firelight on their own. That’s how you get the “bigger space” illusion without any actual square footage.
Succulent Companions That Fill Gaps Without Breaking the Bank
Agave is great, but it grows slowly, and you’ll have empty dirt circles for the first year if you don’t add some companions. Succulents are the perfect filler. They’re cheap, propagate easily, and they share the same low-water needs as agave. In the photo, you see different types of agave and other succulents packed together in those circular beds, and that density is what makes it look lush.
Here’s what I actually planted, and every single one came from a $4 succulent flat at a local nursery or a friend’s overgrown pot:
– Sedum, the ground-hugging green stuff that spreads like crazy.
– Blue chalk sticks, those silvery-blue fingers that add texture.
– Hen and chicks, which multiply faster than you’ll ever want.
– Echeveria, for a soft rosette shape that contrasts with the spiky agave.
Propagation is the money saver. Take a leaf cutting, let it scab over for two days, then lay it on top of dry soil. Three weeks later, you have a new plant. I started with one flat of succulents and ended up with enough to edge an entire path. Not gonna lie, it became a mild obsession. My kitchen windowsill looked like a plant nursery for a while, but the garden budget thanked me.
Mixing the agave beds with succulents: place the agaves in the center, surround them with lower succulents, then edge the whole bed with the red stone. That’s the exact layout from the original photo, and it’s as simple as a design can get.
Putting It All Together on a Realistic Budget
Let’s do a rough cost breakdown, because everyone likes a real number. A steel fire ring runs $50 to $70. Red stone and paver base, around $60. White pavers for the path, $40. Solar lights, $25. Agave plants, $30 if you buy three small ones, or basically free if you source pups from a friend. Succulent cuttings, $10 to $20. You’re looking at somewhere around $200 to $250 for the whole scene, assuming you start from zero.
That’s the honest math. And you can knock it down further by scavenging for used rings, free plants, and leftover stone from a neighbor’s project. I found a stack of white concrete pavers on the curb once, cleaned them with a hose, and used them for a different path project. They looked perfect, and the price was unbeatable.
One last practical note: start with the fire pit location and work outward. That’s your anchor. Then build the path, then the plant beds, then the lighting. If you do it in that order, you’ll avoid the mess of lugging stone through freshly planted agave beds. Trust me, I did it backward and spent an hour picking crushed rock out of succulent rosettes. Learn from my mistake.
The whole point of a budget fire pit garden design is that it works tonight, not in five years. You can build this in a weekend, sit down by the fire, and watch the white stones glow while the agave throws shadows against the wall. It’s simple, it’s cheap, and it’ll make your neighbors ask if you hired a designer.
Pin it, save it, or just text the photo to your friend who keeps talking about landscaping but never starts. Then go grab some agave pups and start digging. Your nightgarden is one weekend away.
Leave a Comment