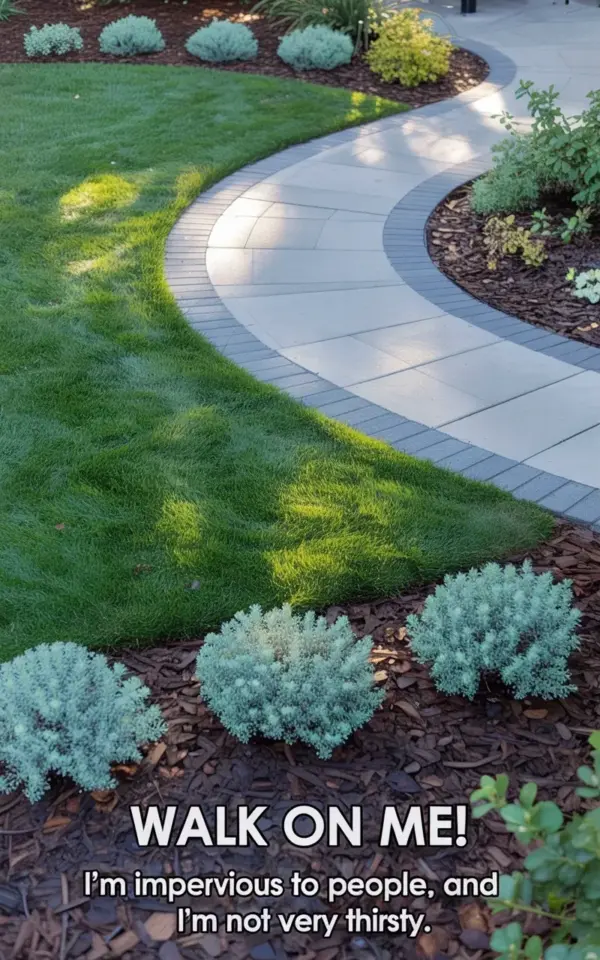
Let’s be honest: that side-of-the-house strip was an embarrassment. For two years it was nothing but bindweed, mystery vines, and the kind of mud that swallowed garden tools whole. Then we finally ripped it all out, and now this curved concrete walkway is the heart of our garden path transformation. I’m still in disbelief. The light gray pavers, the silver-blue Russian sage, the dark mulch that actually stays put. It feels like a real place now, not a forgotten corridor.
We wanted something that looked intentional. Something that guides you from the front gate to the back patio without screaming for attention. And honestly, the curved shape solved a ton of problems. It softened the long, narrow space. It made us slow down. That’s the magic of a good garden path: it changes how you move through your own yard.
Why a curved concrete walkway beat a straight line
Straight paths are efficient. Fine for a driveway, not for a garden that begs for a little mystery. Here’s the thing: once we curved the walkway, the whole space opened up. The curve let us tuck plants around the edges in pockets that felt natural, not forced. And it solved a weird drainage issue we had near the downspout. The path now gently directs rainwater to the lawn instead of pooling against the house. Ok so I did not expect that bonus, but I’ll take it.
Curved walkways also fool the eye into thinking the yard is bigger. Somehow that bend makes the side yard feel less like an alley and more like a destination. If you’re debating, go curve. Trust the instinct.
Planning your garden path layout like a real person
Before you buy a single paver, spend an afternoon with a garden hose or a can of spray paint. Lay out your proposed curve on the ground. Walk it. Then walk it again with a wheelbarrow. A path that looked graceful on paper can feel tight in real life. We widened ours by an extra six inches after my partner almost dragged a trash can into the Russian sage. That’s advice you don’t get from glossy magazines.
- Mark the curve with stakes and string. Don’t wing it with a shovel.
- Measure the width at the narrowest point. No less than three feet for a single person, four if you want to walk side by side.
- Check for underground utility lines. Call your local utility locator. I’m not joking. A friend hit a gas line last summer and it was chaos.
- Test the slope. Water should run away from the house, not toward it. A slight crown in the middle of the path helps.
We spray-painted the entire curve onto the lawn and lived with it for three days. We watered around it. We walked over it in rain boots. That pause let us see where the curve looked too tight (near the holly bush) and where it felt too slack (by the gate). Adjusting early saved us a mountain of re-digging later.
Choosing the right pavers and edging for that polished look
Light gray pavers. That’s what changed everything. Our old path was cracked concrete slabs, mismatched and depressing. The new ones are rectangular, uniform, with a slightly textured surface so they don’t turn slippery after a rain. We went with a 12×24 inch size. Bigger than standard, which meant fewer joints and a cleaner line. Fewer weeds too, less places for bindweed to sneak through.
The edging is what makes the curve hold. We used flexible steel edging, the kind that stakes into the ground and bends gently with the curve. Plastic edging works too but it warps in summer heat. Steel is worth the extra three bucks a foot. Not gonna lie, installing that edging was the fussiest part. Every stake needed to be perfectly aligned or the pavers would shift. But once it’s in, it stays. I’ve kicked that edge a dozen times. It hasn’t budged.
An aside: I hate leveling sand. It gets everywhere. We ended up using a gravel base base instead of pouring concrete under the pavers. Cheaper, easier to fix later, and drains like a dream. The pavers settle into the gravel over time and lock together. It’s a forgiving system for a DIY project. If you mess up a paver, you just pop it out and try again. No guilt, no jackhammer.
Planting drought-tolerant companions like Russian sage
Let’s talk plants. Russian sage is the hero of this garden path. Those silver-blue mounds soften the edge of the concrete without flopping onto the walkway. They bloom for weeks, they smell like lavender after rain, and they laugh at heat. We planted them about 18 inches apart, staggering them so they’d weave a bit. By midsummer they fill in the gaps completely. The bees go crazy for them. So do the neighbors.
We mixed in other drought-resistant plants too. Ornamental grasses like blue fescue and little bluestem. A few sedums that turn pink in fall. One lone agastache that refuses to die no matter how many times I forget to water it. And a low-growing thyme that spills onto the pavers in spots. When you step on it, it releases a tiny puff of herbal scent. That’s the kind of detail that makes a garden path feel intentional.
Full disclosure: I killed the first round of sage by planting it too close to the foundation. It got baked by reflected heat. The second round went four feet out and thrived. So learn from my mistake. Give those plants room to breathe. And if you’re in a dry climate, do not overwater. Russian sage actually blooms better when you stress it a little. Neglect can be a form of kindness.
Mulch matters: dark mulch for weed control and contrast
Dark brown mulch. Not red, not black, not shredded bark. A uniform, fine-textured brown mulch that disappears into the background. That’s what makes the pavers pop and the plants look richer. We spread it two inches deep, right up to the paver edges. It suppresses weeds like a boss. In two months I’ve pulled exactly three dandelion sprouts. That’s it. Previously I was yanking crabgrass every Saturday morning.
The mulch also ties the whole bed together. Where before we had bare dirt and gaps, now there’s a single dark ribbon framing the curve. It makes the path feel like it was always meant to be there, not like an afterthought. We used a cedar-based mulch because it lasts longer and smells good. Pine bark breaks down too fast and dyed mulches leach color. Natural cedar, plain and simple.
Simple maintenance for a polished garden path all year
Ok so the path is done. How do you keep it from sliding back into overgrown chaos? For us, the answer is a ten-minute weekly patrol. I walk the curve with a weeder and a spray bottle of horticultural vinegar. Any weed that dares to show between pavers gets zapped. The mortar joints are sand, not concrete, so I top them up once a year with polymeric sand. That stuff hardens into a flexible seal that stops ants and weeds dead.
In fall we blow leaves off the path. In winter we sweep snow with a broom, not a shovel. Shovels can chip the paver edges. Yes, I learned that the hard way. And in spring we refresh the mulch, just a thin top-up to restore the color. That’s it. No power washing, no sealing, no drama. The path cleans itself with rain. That feeling, when you walk out in the morning and everything looks clean and sharp, it’s worth every hour we spent.
One last weird thing. I sweep the path with a push broom in a pattern. Circular swirls starting at the far end and working back. It leaves those faint arcs in the sand that look like old cobblestone. No one notices but me. I don’t care. It’s my little secret signature on the walkway.
The before and after photos are ridiculous. The “before” looks like a site of surrender. The “after” shows that white text at the bottom of the photo: “Walk on me!” and underneath, “I’m imper…” (the rest got cut off, but you get the idea). That path wants to be walked. It calls you. And when you walk it, you feel the curve gently guiding your steps, the sage brushing your leg, the mulch dark and quiet beneath the plants. It’s not just a path. It’s a decision you made to care about your space.
If you’re thinking about a garden path transformation, start small. Pick one side of the house or one corner of the yard. Lay out a curve with a hose. Buy a dozen pavers. See how it feels. I promise you’ll want more. And when you’re done, tag me or leave a comment. I’d honestly love to see what you create. 🌿
#gardenpath #concretewalkway #landscapingideas #droughttolerantgarden #beforeandafter
Leave a Comment