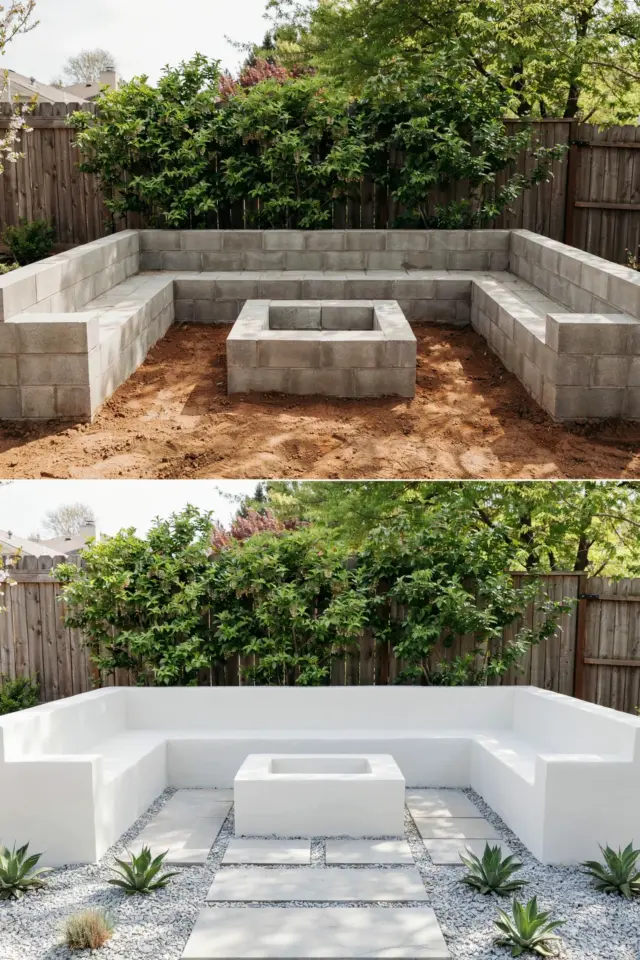
Ok so this was the weekend we finally did it. We built a DIY cinder block backyard seating area with fire pit and honestly it changed the whole way we use our outdoor space. I kept seeing those expensive outdoor sofas at the home stores, but my wallet said nope. So we grabbed some cinder blocks from the hardware store and just went for it. The before and after is wild, like we are looking at two different yards. And the best part? It cost way less than one of those cheap wicker sets.
Why We Chose Cinder Blocks for Our Backyard Seating
Look, cinder blocks are not glamorous. They’re ugly gray rectangles that look like they belong at a construction site. But here’s the thing: they are cheap, they are sturdy, and you don’t need any special skills to stack them. I wanted a seating area that would survive rain, snow, and my clumsy cousin dropping his beer. A wooden bench would rot. Plastic chairs snap. Cinder blocks? They just sit there, forever.
Plus, I hate spending money on things I can build myself. Not gonna lie, that satisfaction hits different when you finish a project with your own hands. We spent about 150 bucks total. That includes the stucco and paint. Compare that to a prefab fire pit set that costs 500 dollars. Yeah, no contest.
The Before: Our Blank Slate Backyard
Our backyard was basically a patch of weedy dirt with a rusty grill in the corner. We had a tiny concrete patio right off the door, but it was only big enough for two chairs. The rest was just nothing. Boring. I’d look out the window and feel kind of sad. Not dramatic or anything, just disappointed.
We needed a spot to hang out. A place to drink coffee in the morning and maybe roast marshmallows at night. But we didn’t have the budget for a total landscape overhaul. So we picked the corner farthest from the house, where the ground was flattest, and decided that was our fire pit zone. It took about fifteen minutes to clear the weeds with a shovel. Simple.
Materials List and What We Spent
I love a good list. Keeps me from running to the store three times in one afternoon (which I still did, but only twice). Here is what we bought:
- 60 standard 8x8x16 cinder blocks – around 55 dollars
- Two bags of stucco mix – 25 bucks total
- One quart of outdoor concrete paint in a warm charcoal color – maybe 12 dollars
- One bag of pea gravel for the base – 8 dollars at the landscape supply place
- Seven pavers (12×12) to put under the fire pit – 20 dollars
- A cheap metal fire pit ring from the hardware store (the one that looks like a bowl) – 30 dollars
That is roughly 150 dollars. And we already owned a trowel, a level, a bucket, and some old towels for cleanup. Oh, and we borrowed our neighbor’s wheelbarrow because ours has a flat tire and I keep forgetting to fix it. Whatever, it worked fine.
Building the Cinder Block Seating Base
First thing we did was lay out the shape. We went with an L-shaped arrangement. Two long sides for seating, one shorter side that we left open for access to the fire pit. I just stacked the blocks dry, no mortar. That way if we ever change our minds we can take it apart. The blocks are heavy enough that they don’t shift around.
We leveled each row as we went. Not gonna lie, the first row took forever because the ground wasn’t perfectly flat. We used a few scoops of gravel under the low spots to shim them. After that it went fast. Stack. Check level. Stack some more. I made the seating two blocks high. That puts you at about 16 inches off the ground, which is a perfect sitting height. If you want a footrest, stack one more block in front.
One weird thing: I accidentally built the back row too far back and the seating depth was like 30 inches. My legs are short, so I couldn’t reach the ground comfortably. Had to pull two rows and redo it. Learn from my mistake. Measure your own leg length before you commit. A normal seat depth is about 18 to 20 inches. I ended up at 19 inches and it’s perfect.
Adding the Stucco Finish and Paint
Raw cinder blocks are ugly. I don’t care what anyone says. They look like prison walls. So we mixed up a batch of stucco and troweled a thin layer on the front faces and the tops of the blocks. We didn’t bother with the backs because those face the fence and nobody sees them. That is a little lazy maybe, but it saved time and money.
The stucco goes on like thick peanut butter. You just smear it on, then smooth it with a damp sponge. It takes maybe ten minutes per block. The kids could help with the sponging part. Let it dry overnight. Then the next day we painted the whole thing with an outdoor concrete paint. We used a roller for the big areas and a brush for the edges. Two coats. The color we chose is a dark grayish charcoal, almost black. It hides dirt and looks sleek against the green grass (and the weeds, honestly).
Here’s a specific tip nobody tells you: if you paint on a sunny hot day, the paint dries too fast and you’ll see roller marks. Do it in the morning or late afternoon. I learned this the hard way and had to do a third coat on one section. Annoying.
Fire Pit Installation and Gravel Patio
The fire pit itself is just a metal ring sitting on seven pavers arranged in a hexagon (or a rough circle, I’m not a geometry expert). We dug out a shallow hole about 4 inches deep, filled it with gravel, then set the pavers on top. The gravel helps with drainage so the pit doesn’t become a mud puddle after a rain. Then we set the metal ring on the pavers and filled the bottom with a few inches of sand. That protects the pavers from the direct heat.
We spread a bag of pea gravel around the whole seating area, maybe a 10-foot diameter circle. This gives a nice clean surface. Keeps the mud away. Makes it feel finished. I like the sound of gravel crunching under your shoes. It feels like camping in your own backyard.
One thing I was worried about was the blocks getting hot when the fire is going. But the seating is far enough back (about 4 feet from the ring) that it stays cool. We tested it with a big fire. No issues. The stucco and paint help reflect heat a little, I think. Or maybe I just got lucky. Either way, we can sit there comfortably.
The After: New Favorite Spot
Looking at the photos now, I can’t believe it’s the same yard. The ugly gray cinder blocks are gone. We have this sleek charcoal L-shaped lounge with a fire glowing in the middle. We added some cheap outdoor cushions from the discount store and a couple of galvanized buckets as side tables. It feels like a real hangout.
We’ve already used it three times in the first week. Once for a late night chat with neighbors. Once for a solo evening with a book and a beer. Once for s’mores with the kids. The fire pit area works great, the wind doesn’t blow the smoke in your face because we positioned the seating with the prevailing wind behind us. That was accidental but I’ll take it.
If you want a backyard transformation that doesn’t break the bank, this is it. Seriously. You can do it in a weekend. Two weekends if you take your time. The materials are cheap. The skills are basic. And the result feels way more high-end than 150 dollars.
Not gonna lie, I’m pretty proud of this one. Pin it if you’re planning your own backyard makeover. You will not regret it. Trust me.
#cinderblockseating #backyardtransformation #diyoutdoor #firepitarea #budgetoutdoor
Leave a Comment