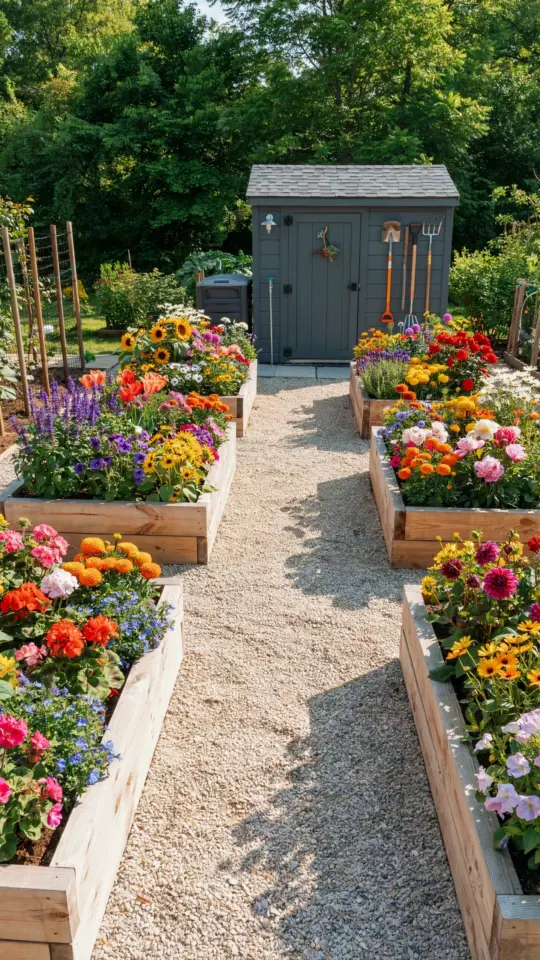
Ok so you finally decided to build raised beds. Good choice. Raised bed vegetable garden layout can be a dream or a total headache depending on how you plan it. I have made almost every mistake in the book, from paths too narrow to haul a wheelbarrow through (stuck in mud, not fun) to beds shaped like a weird Tetris piece. Let me save you the trouble. This is a straightforward guide on what goes wrong and how to avoid it, with gravel paths, tidy walls, and tools actually within reach. Honestly, the difference between a garden you love and one you avoid is just a few inches of path width and a hook on a shed wall.
Path Widths That Fit a Wheelbarrow (And Your Back)
Your first layout mistake, and the one that will annoy you every single time, is making paths too narrow. Here’s the thing: a standard wheelbarrow body is about 24 inches wide. If your path is 18 inches, you cannot push that thing through. You end up carrying heavy buckets instead. Or you drag the wheelbarrow sideways, knocking into your tomato plants. I did that once. Broke a whole branch of San Marzanos. Still bitter about it.
Make your main paths at least 36 inches wide. That gives you room to walk alongside the wheelbarrow without scraping your hips on the bed frame. Secondary paths that only need foot traffic can be 24 inches. But main arteries? Go wider. You will thank me when you are hauling compost, mulch, or a harvest. And please, do not use grass between beds. Grass is a lie. It looks good for three weeks then turns into a muddy weed patch. Gravel is better, more on that later.
A specific weird detail: I once had a path exactly 28 inches. That is the worst. Too narrow for a wheelbarrow, too wide to feel cozy. It became a storage spot for pots I kept tripping over. Don’t be like me.
How Wide Should Your Raised Beds Really Be?
Another classic blunder: making beds so wide you cannot reach the middle. Look, if you build a 5-foot wide bed and plant something in the center, you are either going to stretch awkwardly and throw your back out or step into the bed (compacting soil). Not ideal. Most people can comfortably reach about 24 inches from the edge. So a bed that is 4 feet wide? Fine if you have access from both sides. A bed that is 3 feet wide? Even better if it is against a wall or fence.
I personally like 4 feet max. And I keep my beds 8 to 10 feet long because anything longer feels like a marathon to walk around. But don’t copy me blindly. Test it. Walk outside, pretend you are weeding. Can you reach? If not, narrow the bed. It is way easier to make a bed smaller now than to rip out soil and wood later. Vegetable gardening is already work, do not make it harder by overreaching.
- Narrow beds (2-3 feet): great for against a wall or for small hands
- Standard beds (4 feet): best if you can access from both long sides
- Wide beds (5+ feet): only if you never plan to garden again (joking, but actually don’t)
Tool Storage: Stop Wasting Minutes Every Time
I used to lean my tools against the shed. They fell over. I would step on a rake handle and it would smack me in the face. Seriously. Then I would spend five minutes untangling the hose from the shovel and the hoe from the hose. That is not gardening, that is a circus. The Pinterest description was right: hang your tools on the shed wall. Simple hooks, a pegboard, or even a cheap lumber rack work. You see the tool, you grab it, you put it back. Zero friction.
If you don’t have a shed, no problem. Install a small tool rack on the fence near your garden entrance. Or attach a bar to the side of a raised bed, as long as it doesn’t create shade. The point is organization that takes less than two seconds. Don’t be the person hunting for a trowel while a weed grows an inch taller. Not gonna lie, I still lose my pruning shears sometimes. But now they are on a bright orange lanyard clipped to a hook. I can spot it from 20 feet away.
Gravel Paths: The Weed Free Hack That Works
So you want to reduce weeds between beds. Grass is annoying. Mulch breaks down and needs topping up every year. Bare dirt becomes a mudslide after rain. The answer, and I mean this seriously, is gravel. Not pea gravel, that stuff moves everywhere. Get crushed gravel, sometimes called 3/4 inch minus. It locks together. You lay a weed barrier fabric first, add a layer of gravel about 2 to 3 inches deep, and that path stays tidy for years.
Weeds still blow in on top but they pull out easily because they have nothing to root into. And water drains through fast. Your boots stay clean. Your wheelbarrow rolls smoothly. Honestly, the minute I switched from wood chip paths to gravel, my garden became 80% more pleasant. The only downside is gravel can be a little expensive upfront. But you save so much weeding time that it pays for itself in a season or two. Oh, and don’t use white marble chip gravel. It reflects heat and blinds you on a sunny day. Ask me how I know.
Cramming Too Many Beds Into a Small Space
A common urge: see an empty yard and think “I need more beds!” Then you line them up like a parking lot, leaving barely 18 inches between each one. You can’t turn around. You can’t crouch. You start tripping over bed corners. This layout mistake makes gardening feel like a chore in a crowded closet. Leave breathing room. At least 24 inches between beds, more if you are tall or use a wheeled cart.
Also consider paths that lead somewhere. Not just between beds, but a main walkway from your house to the garden. If you have to tiptoe around to get there, you will garden less. I have a gravel path that goes straight from the back door to the shed. It is 4 feet wide and slightly curved so you don’t feel like you’re walking a prison corridor. That path cost me about 60 bucks in gravel and an afternoon of work. Best afternoon ever.
Quick side note: if your garden is on a slope, layout matters even more. You want beds running along the contour, not up and down. That prevents water from rushing through and eroding your soil. But that’s a whole other article. Just know that a flat, well spaced layout is simpler for beginners.
Sun, Shade, and the Tall Plant Problem
You could have the nicest gravel paths and perfect tool hooks, but if you put tall crops on the south side of your beds, they will shade everything behind them. Common mistake: planting corn, sunflowers, or pole beans along the edge that blocks the sun from shorter plants like lettuce or radishes. The fix? Place tall vegetables on the north side of the bed (if you are in the northern hemisphere) so they cast shade behind them, not onto your other crops. Or just cluster all tall plants together in one bed and shorter ones in another.
This is less about layout and more about planting order. But when you design your raised bed vegetable garden layout, you should already imagine where the sun rises and sets. Walk around your garden at 10 am, 1 pm, and 4 pm. Shadows change. A bed that seems sunny in March might be shaded by a tree in June when the leaves are full. I learned that the hard way when my pepper plants stayed tiny because a maple tree cast afternoon shade. Now I plant only shade-tolerant stuff like kale near that tree.
Don’t Forget the Path From Your Brain to the Garden
This sounds weird but hear me out. The best layout in the world fails if you don’t actually go out and work in it. So make it easy. Have a small bench or a table near the beds where you can set down a cup of coffee, a trowel, or a bucket of weeds. Have a water source close enough that you don’t need to drag a hose across the whole yard. Those little friction points add up. I have a folding camp chair tucked under a tree near my garden. Some days I just sit there for five minutes looking at the plants. That time counts as garden maintenance in my book.
Alright, enough rambling. The core of a good raised bed vegetable garden layout is simple: wide paths, reachable beds, stored tools, and no awkward corners. Start with a pencil sketch. Walk it. Imagine yourself pushing a wheelbarrow. Then adjust. Your future self (with the sore back and the dirty knees) will really appreciate it.
So what are you waiting for? Go measure your yard. Pick up some crushed gravel. Maybe buy a tool hook or two. And if you found this helpful, save it for later. That’s what the Pinterest button is for. Happy growing.
#vegetables #raised beds #garden design #gardening tips #vegetable gardening
Leave a Comment