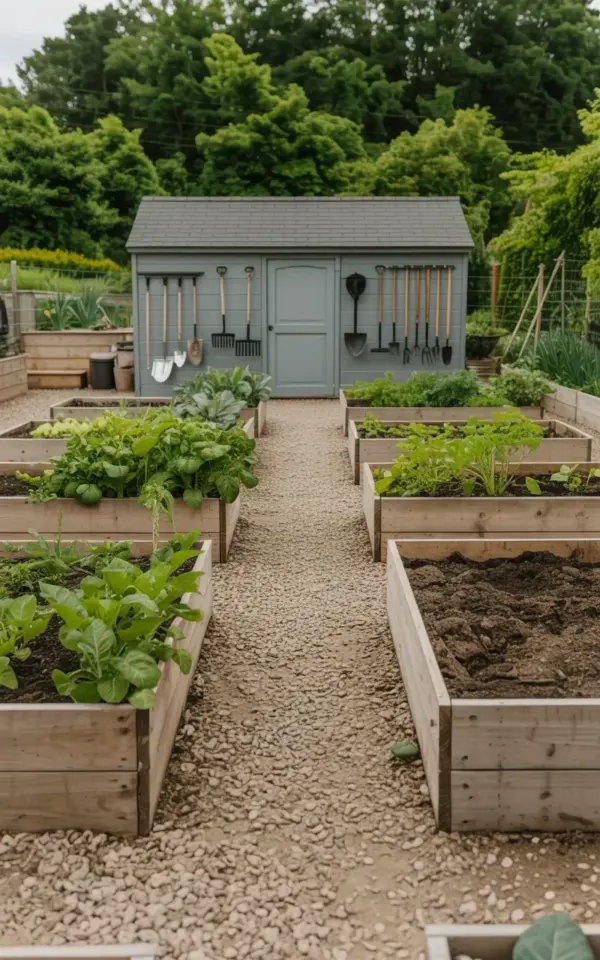
Two years ago, this vegetable garden was a patch of sad, tired soil that sprouted more weeds than anything I actually planted. I walked past it every morning with my coffee, pretending I didn’t see the mess, until the day I finally grabbed a shovel and decided to rip it all out. Honestly, looking at the photo now, I still do a double-take. The transformation from tangled chaos to these symmetrical raised beds and a wide gravel path is exactly what this space needed.
What changed wasn’t just the layout, though. It was the way I thought about my own habits in the garden. I finally stopped fighting the space and started designing it around the way I actually move, reach, and work. If you’re staring at your own messy patch right now, I promise this common-mistakes guide will save you from a few sleepless nights, and maybe a pulled muscle or two.
The Mistake Almost Everyone Makes Before They Build Anything
People buy raised beds before they think about the path between them, and that is completely backwards. I did it myself. I picked up two beautiful wooden kits, hauled them into the yard, and placed them exactly one foot apart because I thought I was saving space. Big mistake. That narrow gap turned into a muddy trench every time it rained, and I had to squeeze sideways through it just to pull a carrot.
The path is the skeleton of the whole garden. It’s not an afterthought, it’s the first thing you should draw on paper. Plan your widest walkway before you even order the lumber. If you can’t fit a wheelbarrow through it, you’re going to hate every single trip you make.
Why Symmetrical Beds Are Worth the Extra Measuring (and Re-Measuring)
There’s a reason symmetrical raised beds look so expensive in those magazine photos. It’s not just about being fancy, it’ about creating a rhythm that your eyes and brain find peaceful. When the beds mirror each other perfectly, the garden feels intentional. It looks calm, even when the tomatoes are going completely wild and taking over their cages.
To get it right, I marked the corners with wooden stakes and ran string lines across the entire area. I must have measured the diagonal distances a dozen times. My neighbor thought I was insane. But the payoff is that walking down the center gravel path feels a little like walking down a neat, orderly aisle, and it makes grabbing a handful of lettuce feel effortless. Random placement just creates visual noise, and that’s the last thing you need after a long day at work.
The Gravel Path: The One Feature You Will Use More Than You Think
I almost went with wood chips for the path, and I’m so glad I didn’t. The light beige crushed stone you see in the photo doesn’t wash away during a heavy downpour, and it doesn’t turn into a soggy mess that sticks to your boots. It drains beautifully. A wide gravel path like this one is actually the hardest working feature in the whole yard.
Here’s what I learned about installing it the right way:
- Dig down at least four inches and lay down a heavy landscape fabric to keep the weeds from pushing through the stone.
- Use crushed stone that packs down, not round pebbles that roll under your feet like marbles.
- Edge the path with metal or stone borders, otherwise the gravel will migrate into the soil every time it rains.
- Go wider than you think you need. A path for one person is a hallway, a path for a wheelbarrow is a tool.
The best part is how little maintenance it needs. Once every few months, I rake it flat to smooth out the traffic patterns. That takes ten minutes. The old muddy path took a power washer, a shovel, and a whole afternoon of complaining.
Turning the Shed Wall Into a Tool Station
The biggest realization I had was that my tools were always far away from where I actually needed them. I used to leave my shovel leaning against a tree or lying on the grass, because walking all the way back to the garage was just too much effort. That’s why mounting the shovels and rakes on the exterior wall of the gray shed became the best organizational decision of the entire project.
This is such a simple trick. You just install a few heavy-duty hooks or a wall-mounted tool rail, and suddenly you have a place for everything. I put the long-handled tools on the left side of the shed door and the smaller hand tools in a wooden crate right next to them. Now I can grab a rake without even opening the shed door. My back thanks me every single time I don’t have to bend over and dig through a pile of clutter.
Obviously, you need to make sure your shed wall faces the garden. Mine does, because the shed is at the end of the path, and that positioning makes the whole work flow feel completely natural.
Soil Depth and the Secret to Healthy, Leafy Plants
You can build the prettiest symmetrical beds in the world, but if you fill them with cheap dirt, you’ll be disappointed. I made this mistake on my very first bed, which I filled with a low-quality topsoil that turned into a crust so hard a rake bounced right off it. Fresh, dark soil is worth every penny. You want a mix that holds moisture but still drains quickly, and you want enough of it that your roots can stretch out.
The leafy greens in the photo didn’t get that way by accident. They had about twelve inches of rich, fluffy soil underneath them. If you’re building a raised bed on top of grass or concrete, you’re creating a container. That means you are fully responsible for every bit of nutrition. Mix in compost at the start and again every season, and your plants will reward you with deep green leaves that actually taste like something.
What to Do With the Weeds That Will Definitely Come Back
Let’s be real for a second. The weeds are still going to show up. No raised bed is a magic shield against nature. But the way you design the space controls how much of a headache they become. The wide gravel path acts as a barrier, so the grass from the surrounding lawn struggles to jump into the beds. The symmetry also leaves no weird corners where weeds can hide and take over unnoticed.
When I spot a weed now, I can walk straight to it, bend over, and pull it in two seconds. There’s no awkward stretching or stepping over a muddy patch. Honestly, tackling a few stragglers every other day beats the hell out of spending an entire Sunday afternoon on my hands and knees. That simple change in layout turned weeding from a dreaded chore into a quick evening ritual.
Making It Feel Like a Real Backyard, Not Just a Growing Area
A vegetable garden can become a harsh, utilitarian patch of dirt if you don’t soften it up. The lush green trees surrounding this yard give it a natural frame, and you can see how the gray of the shed ties into the wooden tones of the beds. Creating moments like that matters even in a small backyard.
I planted a few flowering herbs right in the corners of the beds, not because they produce tons of food, but because they bring in the bees and make the whole space feel friendlier. It’s a tiny detail that makes walking out there feel like a small escape, not just a chore. A garden path that leads your eye somewhere specific, like that shed, gives the whole space a sense of purpose.
So here’s the final truth. You can spend a fortune on fancy kits, or you can build simple boxes from untreated lumber. What matters is the plan you lay out before you dig. A symmetrical layout, a wide path, and a tool wall turn a stressful hobby into something you genuinely look forward to. If you’re ready to tackle this project, start with a measuring tape and a clear vision of how you want to move through the space. What’s the first thing you’re going to fix in your own backyard? I’d love to hear what project is on your list next.
Leave a Comment