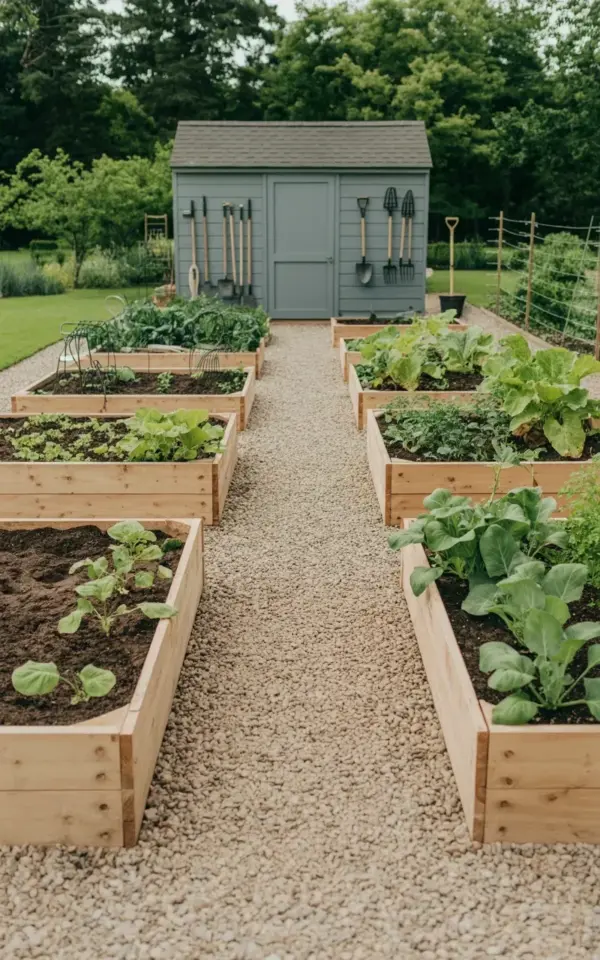
Look, I spent years tripping over muddy hoses and losing trowels in the grass before I finally sat down and figured out a spring raised bed vegetable garden layout with a neat gravel path that actually works without costing a fortune. The specific setup I landed on is exactly what you see in the photo: neat symmetrical beds, a light beige path that honestly changed my life (no more mud-caked boots tracking through the house), and my shed wall turned into a grab-and-go tool station for shovels and rakes. It’s calm, it’s tidy, and it doesn’t require a landscape architect’s budget to recreate.
Affordable Raised Bed Vegetable Garden Layout Ideas
Here’s the thing: you do not need fancy cedar if you’re just starting out. I built my raised beds from untreated pine planks, and they have lasted three seasons without rotting. The key is to line the interior walls with heavy-duty landscape plastic before you add soil. It costs maybe fifteen bucks per bed and buys you an extra few years of life.
The symmetry in the picture isn’t just for looks, either. When you space your beds evenly, irrigation lines run straight and you never waste a square inch of soil. I used regular decking screws instead of nails. Costs a few dollars more upfront but saves your sanity when you need to move a bed or repair a side panel later. Measure twice, screw once. That’s the whole philosophy.
Ok so my beds are roughly 4×8 feet. It’s a standard size that lets you reach the middle from either side without stepping onto the soil. You can build them for under thirty bucks each if you buy lumber at a big box store and cut it yourself.
Building a Budget-Friendly DIY Gravel Path
That wide beige gravel path in the photo? It’s crushed limestone screenings. The local landscape supply place sold it for a fraction of what the big box hardware stores charge for decorative pebbles. Not gonna lie, hauling it myself in a borrowed pickup truck was a workout I did not sign up for. My back hurt for a week. But it saved me a hundred dollars in delivery fees, and I got exactly the path width I wanted.
You must lay down landscape fabric first. Yeah, it’s an extra step and an extra roll of fabric to buy, but it stops the stone from sinking into the mud and mixing with your garden soil. Without it, the path turns into a weedy mess within a season. The light beige color reflects sunlight, which keeps the path cooler underfoot on hot summer days. Plus it looks clean and dry even after a heavy rain.
Here is a quick list of what you actually need for the path:
- A truck or trailer to haul the stone (borrow one if you can).
- Landscape fabric and landscaping staples to hold it down.
- A stiff rake to spread the gravel evenly. A heavy garden rake works better than a leaf rake here.
- Edging strips or simple pressure-treated 2x4s to keep the gravel off the soil beds. I used cheap pine boards painted with leftover exterior paint.
Spread the gravel about two inches deep. Any deeper and your shoes sink in. Any shallower and you see the fabric poking through.
Organizing Garden Tools on a Shed Wall
Forget those expensive pegboard kits with all the little plastic hooks. I mounted a simple strip of scrap plywood to my gray shed wall, painted it the same dark gray, and screwed in a few cheap utility hooks from the hardware store. The whole project cost me under five dollars. Honestly, having shovels and rakes stored vertically means I am not digging through a pile of stuff on the floor every time I want to weed a row.
And seeing them hanging there right outside the door motivates me to clean them off before putting them away. I keep a stiff wire brush in an old coffee can next to the door. Scrape the dirt off the shovel before you hang it up. It takes thirty seconds. Do it. Future you will be grateful when the next gardening season rolls around and your tools are not caked with rust.
Mount the hooks at slightly different heights. That way the rake handle does not bump into the shovel handle. It is a small detail, but it stops the constant clatter and tangling that drives me crazy every time I grab one tool.
Best Vegetables to Plant in a Spring Raised Bed
In the photo, you can see dark soil packed with leafy greens. That’s lettuce, spinach, and a few rows of kale. Raised beds warm up faster than ground soil in early spring, which gives you a head start on cool-season crops. Radishes are ridiculously easy and grow fast. You can harvest them in under a month.
I also sneak in a few short trellises made from bamboo stakes for sugar snap peas. It breaks up the perfect symmetry a little, but the vertical growth gives you way more yield per square foot. Snow peas taste better when they are young and fresh from the vine anyway. They
#raisedbedgarden #vegetablegarden #gardentools #gravelpath #springgarden
Leave a Comment